
The Aptos Light Client (LC) provides a streamlined and efficient way to verify blockchain state transitions and proofs without needing to store or synchronize the entire blockchain.
The following documentation aims to provide a high-level overview of the Aptos LC and its components, along with a guide on how to set up and run or benchmark the Aptos LC.
Sections
An overview of what is the Light Client and the feature set it provides.
A detailed description of the components that make up the Light Client.
A guide on how to set up and run the Light Client.
A guide on how to benchmark the Light Client.
Design of the Light Client
Light clients can be seen as lightweight nodes that enable users to interact with the blockchain without needing to download the entire blockchain history. They rely on full nodes to provide necessary data, such as block headers, and use cryptographic proofs to verify transactions and maintain security.
At the core of the LC there are two proofs:
- Prove epoch transition on the Aptos chain, which is effectively proving a transition from one set of validators to another one.
- Prove at any given point that an account is part of the Aptos state to provide the bridging capabilities between the Aptos and another blockchain.
This is implemented by two proofs, one for each statement. The light client needs to keep track of one hash that uniquely identifies the latest known set of validators that it trusts. The first program is responsible for updating this hash, whereas the second program makes use of this hash to identify a trusted validator set.
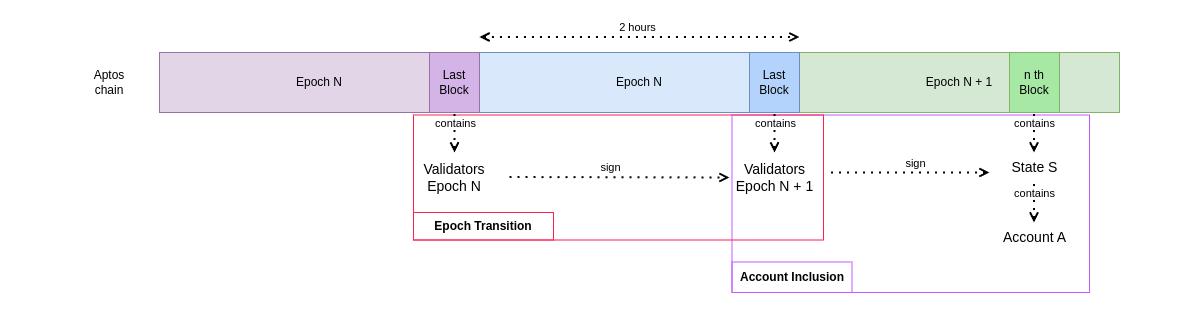
The first proof needs to be generated and submitted to the light client every 2 hours to ensure that the light client's internal state is kept up to date with the running chain.
The second proof is generated and submitted when a proof about some on-chain value is required, for example when a deposit to some account needs to be validated.
The current Verifying Key Hashes which uniquely identify the specific RISC-V binaries for the proof programs, located in the
aptos/aptos-programs/artifacts/
directory are:
epoch_change:0x00749738cdd87d0179d124a1c20f0cb28de2355faf4b00c5f994b3bfa0cfdf48inclusion:0x0011762f50a83396c88be6119d62ef89e5f87bd504dd66537697a05f3c3c1fa7
These values are also present in and used by the solidity fixtures.
Epoch change proof
The Aptos consensus has (at any given time) a set of validators that are charged with executing blocks and sign them to append them to the chain state.
A set of given validators is updated at the last block of every epoch on the chain. An epoch on the Aptos chain has a duration of 2 hours. The light client needs to keep track of the current trusted validator set hash, which is updated on every epoch change.
For a given epoch \(N\) with a set of validators \(V_n\), it is expected to have a block for the transition to epoch \(N+1\) signed by \(V_n\) containing the new validator set \(V_{\text{n+1}}\).
It is the job of the light client to produce a proof at every epoch change to verify the signature on the validators for the new epoch. This is handled by the Epoch Change program.
Epoch Change program IO
Inputs
The following data structures are required for proof generation (detailed data structure references can be found at the end of this document):
- Latest Known
TrustedState: The most recent known state, representing the trusted state for the current epoch.ValidatorVerifier: Validator set information for epoch N, provided by the user.
EpochChangeProof: Proof structure required to transition to the next epoch.LedgerInfoWithSignatures: Signed ledger info that includes the new validator set for epoch N+1, provided by the user.
Outputs
- Previous
ValidatorVerifierHash: The previous validator verifier hash, used for comparison. - Ratcheted
ValidatorVerifierHash: The hash representing the new validator set for epoch N+1.
Inclusion proof
To bridge an account from the Aptos chain to another chain at any given time the LC needs to prove that the given account exists in the chain state for the latest block produced, with a given balance.
To do so, the Light Client will first need to verify that the signature on the latest block corresponds to the validator list known for the current epoch. Then, it will have to prove that the account is part of the updated state that this block commits.
The inclusion program takes in an arbitrary Aptos SparseMerkleProof, so it can represent inclusion of any kind of state
inside of the Aptos blockchain's state root. We have implemented a proof that checks that a given account key has a certain
balance, but this can be adapted to different scenarios without changing the inclusion program. See the
Aptos PFN section of the documentation for more information on the code responsible for
building the SparseMerkleProof.
Inclusion program IO
Inputs
The following data structures are required for proof generation (detailed data structure references can be found at the end of this document):
- Block Validation
- Latest
LedgerInfoWithSignatures: Contains the signed ledger info that acts as a root of trust for the current epoch. ValidatorVerifier: The verifier set for the current epoch.
- Latest
- Merkle Inclusion
- Transaction Inclusion in
LedgerInfo: Verifies that the specified transaction exists in the block with a valid state checkpoint.TransactionInfo: Details of the transaction to be verified.- Transaction Index in Block: Position of the transaction within the block.
TransactionAccumulatorProof: Accumulator proof that confirms the transaction’s inclusion.- Latest
LedgerInfoWithSignatures: Acts as a root of trust.
- Account Inclusion in State Checkpoint: Verifies that the account exists in the blockchain’s state at the block
level.
SparseMerkleProof: Proof that the account is included in the state.- Account Key in Tree: Path of the account within the Merkle tree.
- Value Hash for Account Leaf: Initial hash used for inclusion verification.
- Transaction Inclusion in
Outputs
- Current
ValidatorVerifierHash: The current validator verifier hash, used to validate the incoming data. - State Root Hash: The root hash of the state, derived from the
TransactionInfo::state_checkpoint. - Unique Block Identifier: The identifier of the current block.
- Merkle-tree key: The key that identifies the place/position of the leaf being checked for in the merkle tree.
- Merkle-tree value: The hash of the actual value at the position of the merkle tree leaf.
Edge cases
Latency-wise, the worst case scenario for the light client happens when a user wants to get both proofs at the start of a new epoch, meaning that we want to prove both the Epoch Change Proof and the Inclusion Proof at the same time.
A naïve approach would lead us to a total proving time being equal the sum of their respecting time \(D_{\text{total}} = D_{\text{epoch_change_proof}} + D_{\text{inclusion_proof}}\).
However, because the validator set is identified by a hash that can be calculated quickly outside of the proof, we can actually generate both proofs in parallel since there are no data dependencies between each proof.
Generating both proofs in parallel, we end up with a worst case latency of \(D_{\text{total}} = \max(D_{\text{epoch_change_proof}}, D_{\text{inclusion_proof}})\) which can be approximated by \(D_{\text{total}} = D_{\text{sig_verification}}\) as the majority of the proving time is dedicated to verifying the BLS12-381 signatures used in the block header signatures.
Security considerations
Sphinx
The Sphinx prover is a fork of SP1
and as such inherits a lot from its security design. The current release of Sphinx (v1.0.0) has backported all the
upstream security fixes as of SP1 v1.0.5-testnet. We will continue to update Sphinx with backports of upstream
security fixes and subsequent updates to both Sphinx and the Light Client making them available as hotfixes.
In terms of Sphinx-specific changes that require special attention, here is a non-exhaustive list of Sphinx AIR chips used for pre-compiles that are either not present in upstream SP1, or have had non-trivial changes:
FieldAddChip,FieldSubChip,FieldMulChip: Chips for BLS12-381 Fp acceleration.QuadFieldAddChip,QuadFieldSubChip,QuadFieldMulChip: Chips for BLS12-381 Fp2 acceleration.Bls12381G1DecompressChip: Chip for decompressing BLS12-381 compressed G1 points.Secp256k1DecompressChip: Chip for decompressing K256 compressed points.
There are some SP1 chips and pre-compiles that are not present in Sphinx, such as Uint256MulChip.
Architecture components
Light clients can be seen as lightweight nodes that enable users to interact with the blockchain without needing to download the entire blockchain history. They rely on full nodes to provide necessary data, such as block headers, and use cryptographic proofs to verify transactions and maintain security.
There are four core components that need to exist to have a functional light client bridge running:
- Source Chain Node: A full node of the source chain from which it is possible to fetch the necessary data to generate our proofs.
- Coordinator Middleware: This middleware is responsible for orchestrating the other components that are part of the architecture.
- Light Client Proving Servers: The core service developed by Lurk. It contains all the necessary logic to generate the necessary proofs and exposes it through a simple RPC endpoint.
- Verifier: A software that can verify the proofs generated by the Light Client. This verification can happen in a regular computer, using a Rust verifier exposed by the Proof servers, or it can be implemented as a smart contract living on a destination chain.
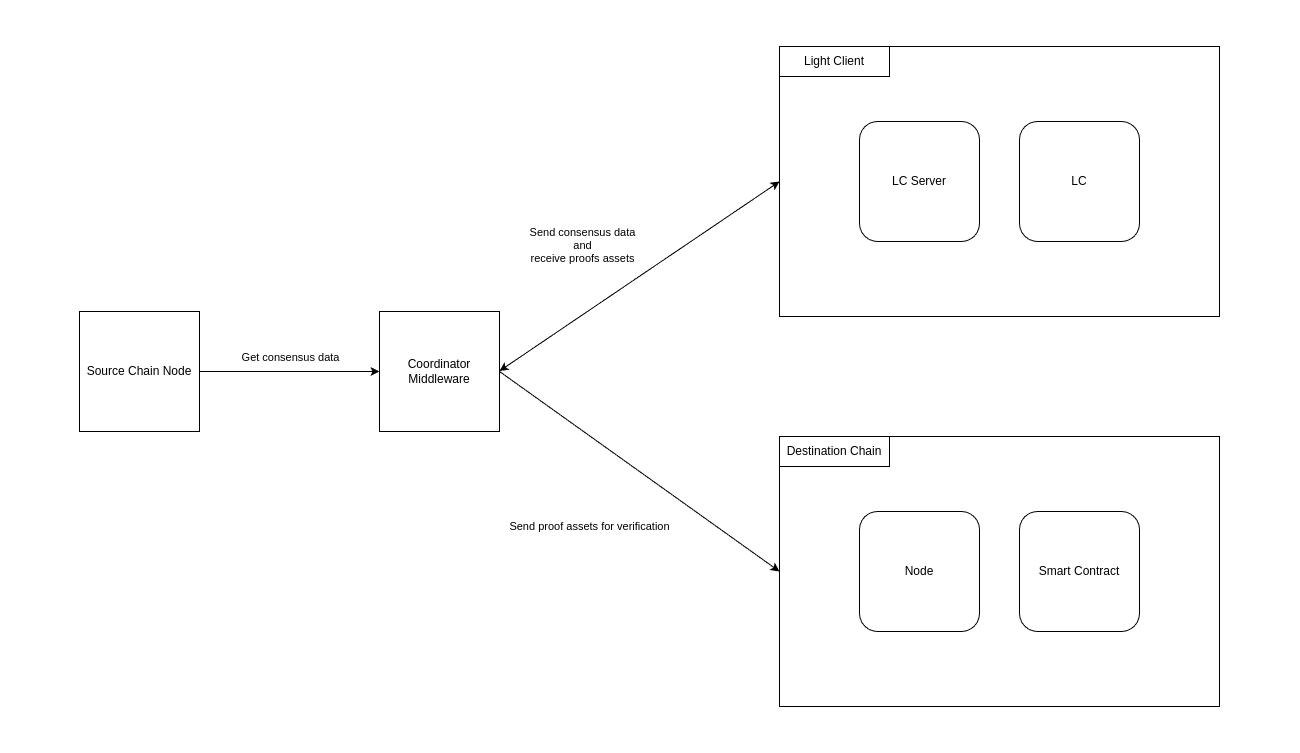
Aptos Full Node
In the case of this particular Light Client, we will need to communicate with an Aptos Full Node to retrieve the necessary data to prove the state of the chain. A deployed Aptos Public Full Node natively exposes RPC endpoints that can be used to query the state of the chain.
However, the current codebase for an Aptos Full Node found
at aptos-labs/aptos-core does not implement the necessary endpoints that
would allow us to retrieve the data we need. It is especially lacking when it comes to fetching data related to the
consensus layer, such as block header signatures.
To make up for that, we forked the repository into our
own argumentcomputer/aptos-core. This forked repository should be the reference for
the Aptos Full Node until the core developers of the Aptos protocol have made the necessary updates.
RPC endpoints
The only updates made to the Aptos Full Node on our forks are meant to expose two new endpoints:
/v1/epoch/proof?epoch_number={:epoch}: This endpoint can be used to get all the necessary data to generate a proof about an Epoch transition. Optionally, one can specify the epoch number to get the data for a specific epoch./v1/accounts/{:address}/proof?block_height={:height}: The endpoint can be called to fetch data to prove the inclusion of the givenaddressin the state of the chain. Optionally, one can specify the block height to get the data at the desired height.
/v1/epoch/proof
📨 Request Payload
-
Epoch number integer
The epoch number for which we want to get the data.
📬 Response Payload
-
LedgerInfoWithSignature object
The signed ledger data for the block that triggered the epoch transition.
-
TrustedState object
A checkpoint of the state representing the validator list for the epoch preceding the one requested.
/v1/accoounts/{:address}/proof
📨 Request Payload
-
Account address string[hex]
Address of an account.
-
Block Height integer
Block height to check inclusion at.
📬 Response Payload
-
SparseMerkleProof object
A data structure containing information to prove that a given account is part of a state resulting from a transaction.
-
Account state leaf key string[hex]
Path in the state Merkle Tree for the account leaf to the state root hash.
-
Account state leaf value string[hex]
Hashed value of the Account leaf.
-
TransactionAccumulatorProof object
A data structure containing information to prove that a transaction is part of the received **LedgerInfoWithSignature **
-
TransactionInfo object
Information about the transaction, notably the state root hash resulting from its execution.
-
Transaction index number
Index associated to the transaction in the accumulator.
-
LedgerInfoWithSignature object
The signed ledger data for the block at the given height.
-
ValidatorVerifier object
Committee in charge of block header signature when the
LedgerInfoWithSignatureswas produced.
Proof Server
The Proof Server is a component of the Light Client that is responsible for generating and serving proofs to the client. The server is designed to be stateless and can be scaled horizontally to handle a large number of requests. The Proof Server can be divided in two distinct implementations:
- Proof programs: The proof program contains the logic that will be executed by our Proof server, generating the succinct proof to be verified. The proof programs are run inside the Sphinx zkVM and prover.
- Server: The server is a layer added on top of the proving service that makes it available to external users via a simple protocol.
Proof programs
This layer of the Proof Server corresponds to the code for which the execution has to be proven. Its logic is the core
of our whole implementation and ensures the correctness of what we are trying to achieve. The programs are written in Rust
and leverages the argumentcomputer/sphinx zkVM to generate the proofs and verify them.
In the design document of both the epoch change proof and the inclusion proof, we describe what each program has to prove. Most computations performed by the proof programs are directed towards cryptographic operations, such as verifying signatures on the block header.
To accelerate those operations, we leverage some out-of-VM circuits called pre-compiles that are optimized for those specific operations. The following libraries that make use of our pre-compiles are used in our codebase:
- bls12_381: A library for BLS12-381 operations based on
zkcrypto/bls12_381making use of pre-compiles for non-native arithmetic. Used for verifying the signatures over block header. - sha2: A library for SHA-256 hashing making use of pre-compiles for the compression function. Used to hash the message signed by the committee and other pieces of data.
- tiny-keccak: A library for SHA-3 hashing, making use of
pre-compiles for the compression function. Used for hashing the internal Aptos data structures and verifying the
SparseMerkleProof.
The code to be proven is written in Rust and then compiled to RISC-V binaries, stored in aptos/aptos-programs/artifacts/.
We then use Sphinx to generate the proofs and verify them based on those binaries. The generated proofs can be STARKs, which
are faster to generate but cannot be verified directly on-chain, or wrapped in a SNARK, which take longer to generate but can
be verified cheaply on-chain.
Server
The server is a layer added on top of the proving service that makes it available to external users. It is a simple TCP server that is open to incoming connections on a port specified at runtime.
The server is divided in two, with one main entrypoint. This allows us to handle the worst-case scenario of having to generate both proofs in parallel, since each server handles one proof at a time. It is possible to generate and verify both STARK core proofs and SNARK proofs.
The RPC protocol used by the servers is a very simple length-prefixed protocol passing serialized messages back and forth.
The messages are defined in proof-server/src/types/proof_server.rs.
See also the documentation on the client.
Client
The client is the coordinator of the Light Client. It is responsible for orchestrating the communication between the Proof Server and the Aptos Full Node. In our current example implementation it can also serve as a drop-in replacement for what an on-chain verifier would be responsible for.
The client also demonstrates how to request data from our Aptos PFN endpoints, how to forward it to the proof servers using the simple binary RPC protocol, example and how to parse the received responses from the server. See the source for more details.
The client has two phases:
- Initialization: The client fetches the initial data from the Aptos node and generates the initial state for itself and the verifier.
- Main Loop: The client listens for new data from the Aptos node and generates proofs for the verifier to verify. This includes new proofs for epoch changes.
The current implementation of the client is specifically designed to cover the worst case scenario of having to handle the proofs generation in parallel. This flow happens during initialization where we prove the latest epoch change on the Aptos network while producing an inclusion proof for a given account at the latest block.
The bundled example client currently only requests and verifies STARK proofs. The proof servers have support for generating and verifying SNARK proofs, but the example client does not yet make use of this.
Run the Light Client
In the previous section, we covered all the architecture components of the Light Client and explained their specific roles. In this section we will cover how to set them up and run the Light Client to start proving epoch change and inclusion proofs.
As the computational requirements for the Proof Server are heavy, here are the machine specs for each component, based on off-the-shelf machines from cloud providers:
| CPU | Memory (GB) | Disk Size (GB) | Example | |
|---|---|---|---|---|
| Client | 8 cores, 16 threads | 32 | 64 | GCP C3 |
| Proof Server | Intel x86_64 Sapphire Rapids, 128 vCPU, bare metal, supports avx512_ifma and avx512_vbmi2 | 1024 | 150 | AWS r7iz.metal-32xl |
| Aptos Full Node | 8 cores, 16 threads (Intel Xeon Skylake or newer) | 32 | A few 100's GB | GCP C3 |
Note
Generating a proof needs a minimum of 128GB, but does not make use of more than ~200GB of memory.
Configuration
To run the Proof Server and the Client there are a few requirements that needs to be followed on the host machine.
First, you need to install nightly Rust and Golang. You can find the installation instructions for Rust here and for Golang here.
Make sure to install nightly Rust, which is necessary for AVX-512 acceleration:
rustup default nightly
We pin the nightly Rust version in rust-toolchain.toml to prevent unknown future changes
to nightly from interfering with the build process. In principle however, any recent nightly release of Rust should
work.
Second, you need to install the cargo-prove binary.
- Install
cargo-provefrom Sphinx:
git clone git@github.com:argumentcomputer/sphinx.git && \
    cd sphinx/cli && \
    cargo install --locked --path .
- Install the toolchain. This downloads the pre-built toolchain from SP1
cd ~ && \
   cargo prove install-toolchain
- Verify the installation by checking if
succinctis present in the output ofrustup toolchain list
Finally, there's a few extra packages needed for the build:
sudo apt update && sudo apt-get install -y build-essential libssl-dev pkg-config libudev-dev cmake
For non-Ubuntu/non-Debian based distros, make sure to install the equivalent packages.
Logging Configuration
The light client uses two logging systems:
- Rust logging via
tokio-tracing, configured through theRUST_LOGenvironment variable. See the tracing documentation for detailed configuration options. - Go logging for FFI calls, configured through the
SP1_GO_LOGenvironment variable.
To set a global log level (e.g. warn), configure both variables:
RUST_LOG=warn SP1_GO_LOG=warn cargo run ...
Valid log levels are: error, warn, info, debug, trace, off
Setup an Aptos Full Node
As we covered in the previous section, the current reference for the Aptos Full Node
codebase is argumentcomputer/aptos-core. The current version can be found on the
branch argumentcomputer/aptos-core:release/aptos-node-v1.14.0-patched.
The setup we will go over is a setup by building the code source.
The relevant documentation concerning a Full Node deployment can be found on the Aptos website.
First, clone the repository, cd into it and checkout the patched branch:
git clone git@github.com:argumentcomputer/aptos-core.git && cd aptos-core && git checkout release/aptos-node-v1.14.0-patched
Then, we have some configuration to set up. Following the Aptos documentation:
-
Download Aptos mainnet Genesis blob:
curl -O https://raw.githubusercontent.com/aptos-labs/aptos-networks/main/mainnet/genesis.blob -
Download Aptos mainnet waypoint file:
curl -O https://raw.githubusercontent.com/aptos-labs/aptos-networks/main/mainnet/waypoint.txt -
Setup a fullnode.yaml that serves as a configuration file for the node. Here is an example of such a configuration file, make sure to set the proper data directory and network address for your deployment:
base:
  # Update this value to the location you want the node to store its database
  data_dir: "/home/user/aptos/db"
  role: "full_node"
  waypoint:
    # Update this value to that which the blockchain publicly provides. Please regard the directions
    # below on how to safely manage your genesis_file_location with respect to the waypoint.
    from_file: "./waypoint.txt"

execution:
  # Update this to the location to where the genesis.blob is stored, prefer fullpaths
  # Note, this must be paired with a waypoint. If you update your waypoint without a
  # corresponding genesis, the file location should be an empty path.
  genesis_file_location: "./genesis.blob"

full_node_networks:
  - discovery_method: "onchain"
    # The network must have a listen address to specify protocols. This runs it locally to
    # prevent remote, incoming connections.
    listen_address: "/ip4/127.0.0.1/tcp/6180"
    network_id: "public"

# API related configuration, making it available at a given address.
api:
  enabled: true
  # Update this to fit your deployment address for the node.
  address: 127.0.0.1:8080

# /!\ IMPORTANT/!\
# This configuration is especially important for the proof server to work.
# This configuration allows us to access the state at each new block,
# effectively allowing us to create inclusion proof about accounts.
storage:
  buffered_state_target_items: 1

# This configuration allows for a fast synchronisation of the node.
state_sync:
  state_sync_driver:
    bootstrapping_mode: DownloadLatestStates
    continuous_syncing_mode: ExecuteTransactionsOrApplyOutputs
Once the configuration is done, we just need to run the node:
cargo run -p aptos-node --release -- -f ./fullnode.yaml
Note
The synchronisation mode that we use as an example above should reach the latest produced block in around 1 hour.
Deploy the Proof Server
Note
We will deploy the server as through the execution of the bianry with
cargoin this example. It is also possible to deploy the proof server through its docker image. To do so, please refer to the dedicated documentation.
For the Proof Server, we have to take into account that generating a proof is a heavy operation. To avoid overloading the server, we can split the proof generation into two servers. The primary server will handle inclusion proofs, and the secondary server will handle epoch change proofs.
For best results, the primary and secondary servers should be deployed to different server instances, so that proof generation can happen in parallel if necessary.
Requirements
Make sure to finish the initial configuration first.
Environment variables
RUSTFLAGS="-C target-cpu=native --cfg tokio_unstable -C opt-level=3":-C target-cpu=native: This will ensure that the binary is optimized for the CPU it is running on. This is very important for plonky3 performance.--cfg tokio_unstable: This will enable the unstable features of the Tokio runtime. This is necessary for aptos dependencies.-C opt-level=3: This turns on the maximum level of compiler optimizations.- This can also be configured in
~/.cargo/config.tomlinstead by adding:[target.'cfg(all())'] rustflags = ["--cfg", "tokio_unstable", "-C", "target-cpu=native", "-C", "opt-level=3"]
Note
One can also set the
RUST_LOGenvironment variable todebugto get more information about the execution of the server.
Deploy the secondary server
Now that our deployment machine is properly configured, we can run the secondary server.
git clone git@github.com:argumentcomputer/zk-light-clients.git && \
  cd zk-light-clients/aptos/proof-server && \
  SHARD_BATCH_SIZE=0 RUSTFLAGS="-C target-cpu=native --cfg tokio_unstable -C opt-level=3" cargo run --release --bin proof_server -- --mode "single" -a <NETWORK_ADDRESS>
Deploy the primary server
Finally, once the primary server is configured in the same fashion, run it:
git clone git@github.com:argumentcomputer/zk-light-clients.git && \
  cd zk-light-clients/aptos/proof-server && \
  SHARD_BATCH_SIZE=0 RUSTFLAGS="-C target-cpu=native --cfg tokio_unstable -C opt-level=3" cargo run --release --bin proof_server -- --mode "split" -a <NETWORK_ADDESS> --snd-addr <SECONDARY_SERVER_ADDRESS>
Note
Logging can be configured via
RUST_LOGfor Rust logging andSP1_GO_LOGfor Go FFI logging. For example:RUST_LOG=debug SP1_GO_LOG=debug cargo run ...See the configuration documentation for more details.
Run the Client
The final component that we need to set up is the Client. As both the Aptos Full Node and the Proof Server are available, we just need to point the client to the necessary addresses so it can communicate with both.
Requirements
Make sure to finish the initial configuration first.
Launch the Client
With our deployment machine properly configured, we can run the client.
git clone git@github.com:argumentcomputer/zk-light-clients.git && \
  cd zk-light-clients/aptos/proof-server && \
  RUST_LOG="debug" cargo run -p proof-server --release --bin client -- --proof-server-address <PRIMARY_SERVER_ADDRESS> --aptos-node-url <APTOS_NODE_URL>
The client only needs to communicate with the primary proof server, since requests to the secondary server are automatically forwarded.
With this, the Client should run through its initialization process and then start making requests to both the Proof Server and the Aptos Full Node, generating proofs as needed in a loop.
Benchmark proving time
There are two types of benchmarks that can be used to get insight on the proving time necessary for each kind of proof generated by the proof server. The first type will generate STARK core proofs, and represents the time it takes to generate and prove execution of one of the programs. The second type will generate a SNARK proof that can be verified on-chain, and represents the end-to-end time it takes to generate a proof that can be verified directly on-chain. Due to the SNARK compression, the SNARK proofs take longer to generate and require more resources.
The worst case latency (described here) can be evaluated by running the end-to-end benchmark for each of the two proofs, and looking at the maximum of the time it took to genereate each proof.
The numbers we've measured using our production configuration are further detailed in the E2E Benchmarks section. They are included below as well for reference:
For STARKs:
{
  "e2e_proving_time": 51489,
  "inclusion_proof": {
    "proving_time": 46636,
    "request_response_proof_size": 22830628
  },
  "epoch_change_proof": {
    "proving_time": 51489,
    "request_response_proof_size": 25482668
  }
}
For SNARKs:
{
  "e2e_proving_time": 694809,
  "inclusion_proof": {
    "proving_time": 689228,
    "request_response_proof_size": 18454
  },
  "epoch_change_proof": {
    "proving_time": 694809,
    "request_response_proof_size": 28661
  }
}
Blob proofs on Ethereum
We're also working on a STARK verifier that could be used alongside Ethereum's new blob transactions, which can be used to drastically minimize the gas costs for large data such as STARK proofs. This is still experimental and an early work-in-progress, but preliminary benchmarks using an Ethereum-friendly hash function and compression show that proof generation could be achieved at around 6 to 7 minutes.
GPU acceleration
Currently, the Sphinx prover is CPU-only, and there is no GPU acceleration integrated yet. We are working on integrating future work for GPU acceleration as soon as we can to improve the overall proving time.
Configuration for the benchmarks
In this section we will cover the configuration that should be set to run the benchmarks. It is also important to run the benchmarks on proper machines, such as the one described for the Proof Server in the Run the Light Client section.
Requirements
The requirements to run the benchmarks are the same as the ones for the client. You will need to follow the instructions listed here.
Other settings
Here are the standard config variables that are worth setting for any benchmark:
-
RUSTFLAGS="-C target-cpu=native --cfg tokio_unstable -C opt-level=3"This can also be configured in
~/.cargo/config.tomlby adding:[target.'cfg(all())'] rustflags = ["--cfg", "tokio_unstable", "-C", "target-cpu=native", "-C", "opt-level=3"] -
SHARD_SIZE=4194304(for SNARK),SHARD_SIZE=1048576(for STARK)The highest possible setting, giving the fewest shards. Because the compression phase dominates the timing of the SNARK proofs, we need as few shards as possible.
-
SHARD_BATCH_SIZE=0This disables checkpointing making proving faster at the expense of higher memory usage
-
RECONSTRUCT_COMMITMENTS=falseThis setting enables keeping the FFT's data and the entire Merkle Tree in memory without necessity to recompute them in every shard.
-
SHARD_CHUNKING_MULTIPLIER=<32|64>(for SNARK),SHARD_CHUNKING_MULTIPLIER=1(for STARK)This settings is usually selected depending on specific hardware where proving is executed. It is used to determine how many shards get chunked per core on the CPU.
-
cargo bench --release <...>Make sure to always run in release mode with
--release. Alternatively, specify the proper compiler options viaRUSTFLAGS="-C opt-level=3 <...>",~/.cargo/config.tomlor Cargo profiles -
RUST_LOG=debug(optional)This prints out useful Sphinx metrics, such as cycle counts, iteration speed, proof size, etc. NOTE: This may cause a significant performance degradation, and is only recommended for collecting metrics other than wall clock time.
SNARK proofs
When running any tests or benchmarks that makes Plonk proofs over BN254, the prover leverages some pre-built circuits artifacts. Those circuits artifacts are generated when we release new versions of Sphinx and are automatically downloaded on first use. The current address for downloading the artifacts can be found here, but it should not be necessary to download them manually.
Benchmark individual proofs.
In this section we will cover how to run the benchmarks for the individual proofs. The benchmarks are located in
the light-client crate folder.
Benchmarks can be classified in two distinct categories:
- end-to-end: Those benchmarks are associated with programs that are meant to reproduce a production environment settings. They are meant to measure performance for a complete end-to-end flow.
- internals: Those benchmarks are associated with programs that are solely meant for performance measurements on specific parts of the codebase. They are not meant to measure performance for, or reproduce a production environment settings.
End-to-end
- e2e: Benchmark that will run a proof generation for both the epoch change program and the inclusion program. The goal here is to test the complete flow for our light client and get cycle count and proving time for it. Note that each proof is handled sequentially, so running it might take some time.
- epoch_change: Benchmark that will run a proof generation
for epoch change program.
This program will execute a hash for the received
ValidatorVerifierto ensure that the signature is from the previous validator set, execute aTrustedState::verify_and_ratchet_innerand finally generate the hash for the verifiedValidatorVerifier. - inclusion: Benchmark that will run a proof generation for the inclusion program. It is meant to assess the cost of verifying a Merkle proof for a given leaf and a given root.
Internals
- sig: Benchmark that will run a proof generation for the signature verification program. This program mainly executes an aggregated signature verification for an aggregated signature and a set of public keys.
The benchmark that is the closest to a production scenario is e2e. Most of
the other benchmarks are more specific and are meant to assess the cost
of specific operations.
Running the benchmarks
Using Makefile
To ease benchmark run we created a Makefile in the light-client crate folder.
Just run:
make benchmark
You will then be asked for the name of the benchmark you want to run. Just fill in the one that is of interest to you:
$ make benchmark
Enter benchmark name: e2e

  ...
Info
For the
epoch_change,inclusion, andsigbenchmarks, you can measure the time to generate a SNARK proof by passing theMODE="SNARK"environment variable.
Manual
Run the following command:
SHARD_BATCH_SIZE=0 cargo bench --features aptos --bench execute -- <benchmark_name>
Interpreting the results
Before delving into the details, please take a look at the cycle tracking documentation from SP1 to get a rough sense of what the numbers mean.
The benchmark will output a lot of information. The most important parts are the following:
Total cycles for the program execution
This value can be found on the following line:
INFO summary: cycles=63736, e2e=2506, khz=25.43, proofSize=2.66 MiB
It contains the total number of cycles needed for the program, the end-to-end time in milliseconds, the frequency of the CPU in kHz, and the size of the proof generated.
Specific cycle count
In the output, you will find a section that looks like this:
DEBUG ┌╴read_inputs
DEBUG └╴9,553 cycles
DEBUG ┌╴verify_merkle_proof
DEBUG └╴40,398 cycles
These specific cycles count are generated by us to track the cost of specific operations in the program.
Proving time
The proving time is an output at the end of a benchmark in the shape of the following data structure, with each time in milliseconds:
{
  ratchet_proving_time: 100000,
  merkle_proving_time: 100000
}
Alternative
Another solution to get some information about proving time is to run the tests located in the light-client
crate. They will output the same logs as the benchmarks, only the time necessary
to generate a proof will change shape:
Starting generation of Merkle inclusion proof with 18 siblings...
Proving locally
Proving took 5.358508094s
Starting verification of Merkle inclusion proof...
Verification took 805.530068ms
To run the test efficiently, first install nextest following its documentation.
Ensure that you also have the previously described environment variables set, then run the following command:
SHARD_BATCH_SIZE=0 cargo nextest run --verbose --release --profile ci --features aptos --package aptos-lc --no-capture
Note
The
--no-captureflag is necessary to see the logs generated by the tests.
Some tests are ignored by default due to heavier resource requirements. To run them, pass --run-ignored all
to nextest.
A short list of useful tests:
test_execute_epoch_change: Executes theepoch_changeprogram inside the zkVM but does not generate any proofs.test_prove_epoch_change: Generates and verifies a STARK proof of theepoch_changeprogram.test_snark_prove_epoch_change: Generates and verifies a SNARK proof of theepoch_changeprogram.test_execute_inclusion: Executes theepoch_changeprogram inside the zkVM but does not generate any proofs.test_prove_inclusion: Generates and verifies a STARK proof of theepoch_changeprogram.test_snark_inclusion: Generates and verifies a SNARK proof of theepoch_changeprogram.
End-to-end benchmarks
The end-to-end benchmark is meant to benchmark the time taken to send both of the proofs generation request to the Proof Server, have a parallel computation happen and receive the two proofs back. This benchmark is meant to simulate the worst case scenario where the client has to generate two proofs in parallel. It can run the proofs in sequence if the benchmark is running in a single machine, to prevent resource exhaustion.
The benchmark can be found in
the
proof-server
crate. It can be run with the following command:
RUN_PARALLEL="0" RECONSTRUCT_COMMITMENTS=false SHARD_CHUNKING_MULTIPLIER=1 SHARD_SIZE=1048576 SHARD_BATCH_SIZE=0 RUSTFLAGS="-C target-cpu=native --cfg tokio_unstable -C opt-level=3" PRIMARY_ADDR="127.0.0.1:8080" SECONDARY_ADDR="127.0.0.1:8081" cargo bench --bench proof_server
This benchmark will spawn the two servers locally and make two requests in sequence to them. This generates both proofs in the same machine, one after the other. In a production setting, the two prover servers will be in different machines, and the two proofs would be generated in parallel. This returns times that are closer to a production setting, without any resource exhaustion when generating the proofs.
To run the proofs in parallel even though it's running in one single machine, pass the RUN_PARALLEL=1 environment
variable
when running the benchmark. This is not recommended as the total reported time for generating both proofs at the same
time
in the same machine will be longer than a properly configured production setting where the proofs are generated by
different
machines.
The benchmark returns two main metrics for each proof:
e2e_proving_time: Time in milliseconds taken to send both request to the Proof Server and generate both proofs.inclusion_proof:proving_time: Time in milliseconds taken to generate the inclusion proof.request_response_proof_size: Size of the proof in bytes returned by the server.
epoch_change_proof:proving_time: Time in milliseconds taken to generate the epoch change proof.request_response_proof_size: Size of the proof in bytes returned by the server.
For our production configuration, we currently get the following results:
{
  "e2e_proving_time": 65543,
  "inclusion_proof": {
    "proving_time": 54239,
    "request_response_proof_size": 17520651
  },
  "epoch_change_proof": {
    "proving_time": 65543,
    "request_response_proof_size": 20154137
  }
}
on r7iz.metal-32xl AWS EC2 instance. The sphinx's commit used
is: d392acc
SNARK proofs
To enable SNARK proving, just pass the environment variable SNARK=1 when running:
SNARK="1" RECONSTRUCT_COMMITMENTS=false SHARD_CHUNKING_MULTIPLIER=64 SHARD_SIZE=4194304 SHARD_BATCH_SIZE=0 RUSTFLAGS="-C target-cpu=native --cfg tokio_unstable -C opt-level=3" PRIMARY_ADDR="127.0.0.1:8080" SECONDARY_ADDR="127.0.0.1:8081" cargo bench --bench proof_server
For our production configuration, we currently get the following results:
{
  "e2e_proving_time": 519213,
  "inclusion_proof": {
    "proving_time": 519213,
    "request_response_proof_size": 18600
  },
  "epoch_change_proof": {
    "proving_time": 519162,
    "request_response_proof_size": 28709
  }
}
on r7iz.metal-16xl AWS EC2 instance. The sphinx's commit used
is: d392acc
Looking for optimal Sphinx parametrs
Sometimes it is possible to get some boost in performance on a specific benchmarking machine tuning
SHARD_CHUNKING_MULTIPLIER variable. It's optimal value depends on the number of CPU cores
and hence must be obtained empirically (e.g. by running e2e bench multiple times varying value of
SHARD_CHUNKING_MULTIPLIER). The e2e_bench.sh script is provided in the root of the workspace, specifically
for this case. For r7iz.metal-16xl AWS EC2 instance, its optimal value is 32 (for SNARK).
Benchmark on-chain verification
Our Light Client is able to produce SNARK proofs that can be verified on-chain. This section will cover how to run the benchmarks for the on-chain verification.
To be able to execute such tests the repository contains a project called solidity that is based
off Foundry which demonstrates the Solidity verification using so-called
fixtures (JSON files) containing the proof data (proof itself, public values and verification key) required for running
the verification for both epoch-change and inclusion programs. These fixtures are generated from a SNARK proof generated
by the proof servers, but currently the fixtures generated are meant for simple testing only.
The contracts used for testing can be found in the sphinx-contracts repository which is used as a dependency.
Requirements
Make sure that you have properly set up the sphinx-contracts submodule. If you haven't done so, you can do it by
running the following command:
git submodule update --init --recursive
Run the tests
To run the tests, navigate to the solidity/contracts directory and execute the following command:
cd solidity/contracts && \
  forge test
The output should look like this:
% cd solidity/contracts && forge test
[⠊] Compiling...
[⠒] Compiling 13 files with Solc 0.8.26
[⠢] Solc 0.8.26 finished in 1.03s
Compiler run successful!

Ran 13 tests for test/test_lc_proofs.t.sol:SolidityVerificationTest
[PASS] testEpochChangeSignerHashUpdate() (gas: 346345)
[PASS] testFailInvalidSignerHashEpochChange() (gas: 313381)
[PASS] testFailInvalidSignerHashInclusion() (gas: 315465)
[PASS] testFail_FakeProofEpochChange() (gas: 8660281895700906338)
[PASS] testFail_FakeProofInclusion() (gas: 8660281895700906453)
[PASS] testFail_FakePublicValuesEpochChange() (gas: 33234)
[PASS] testFail_FakePublicValuesInclusion() (gas: 34988)
[PASS] testFail_WrongVkValuesEpochChange() (gas: 334082)
[PASS] testFail_WrongVkValuesInclusion() (gas: 334846)
[PASS] testValidEpochChangeProofCore() (gas: 2284085)
[PASS] testValidEpochChangeProofPlonk() (gas: 388563)
[PASS] testValidInclusionProofCore() (gas: 2285885)
[PASS] testValidInclusionProofPlonk() (gas: 421586)
Suite result: ok. 13 passed; 0 failed; 0 skipped; finished in 18.22ms (84.02ms CPU time)

Ran 1 test suite in 142.15ms (18.22ms CPU time): 13 tests passed, 0 failed, 0 skipped (13 total tests)
Currently, the verification of Plonk proof (either epoch-change or inclusion program) costs ~318k gas.
Fixture generation
If you wish to either run the tests with custom fixtures or regenerate the existing ones, you can do so by running the
fixture-generator Rust program. This program will run the end-to-end proving (either epoch-change or inclusion) and
export the fixture file to the relevant place (solidity/contracts/src/plonk_fixtures).
To run the fixture-generator for the inclusion program, execute the following command:
RUST_LOG=info RUSTFLAGS="-C target-cpu=native --cfg tokio_unstable -C opt-level=3" SHARD_SIZE=4194304 SHARD_BATCH_SIZE=0 cargo run --release --bin generate-fixture -- --program inclusion --language solidity
Tips
Check that the fixtures have been updated by running
git status.
Note
You might be encountering issue with updating
sphinx-contractsFoundry dependency, in this case try manually specifying accessing the submodule via SSH like this:git config submodule.aptos/solidity/contracts/lib/sphinx-contracts.url git@github.com:argumentcomputer/sphinx-contracts
GitHub Release and Patch process
This section is for internal usage. It documents the current release and patch process to ensure that anyone is able to run it.
Release process
The release process is mostly automated through the usage of GitHub Actions.
A release should be initiated through the manually triggered GitHub Action Create release PR. When triggering a release,
the reference base that should be chosen is the dev branch, with a major or minor Semver release type, aptos light-client and the desired release version. The specified release version should follow the Semver standard.
This action pushes a new branch named ``release/aptos-v(whererelease-versionomits the patch number, e.g.1.0) based on the most recent corresponding major/minor release/branch, ordevif none exists. This will be the base of the PR, which will persist across any patches. Then, a PR branch is created off of the base branch calledrelease-pr-aptos-v. A commit is then automatically applied to the PR branch to bump all the Cargo.toml` version of the relevant crates, and the PR is opened. The developer in charge of the release should use this branch to make any necessary updates to the codebase and documentation to have the release ready.
Once all the changes are done, the PR can be merged with a merge commit. This will trigger the Tag release action that is charged with the publication of a release and a tag named aptos-v<release-version>. It will use each commit to create a rich changelog categorized by commit prefix, e.g. feat:, fix:, and chore:.
The base branch should be saved as the release source and in case of any future patches.
Patch process
The patch process is similar to that of a major/minor release.
Create release PR should also be triggered with the patch Semver release type and the desired patch version, e.g. 1.0.1 for a patch to 1.0.0. A PR will be opened from a branch named patch/aptos-v<patch-version> (e.g. v1.0.1) with the base release/aptos-v<release-to-fix> (e.g. v1.0). A commit is automatically applied to bump all the Cargo.toml version of the relevant crates. The developer in charge of the patch should use this branch to make any necessary updates to the codebase and documentation to have the patch ready.
Once all the changes are done, the PR can be squash and merged in release/aptos-v<release-to-fix>. This will trigger the Tag release action that is charged with the publication of a release and a tag named aptos-v<patch-version>.
Finally, the developer may also need to port the relevant changes to dev, such as incrementing the version number for a latest release, so that they are reflected on the latest development stage of the Light Client.